
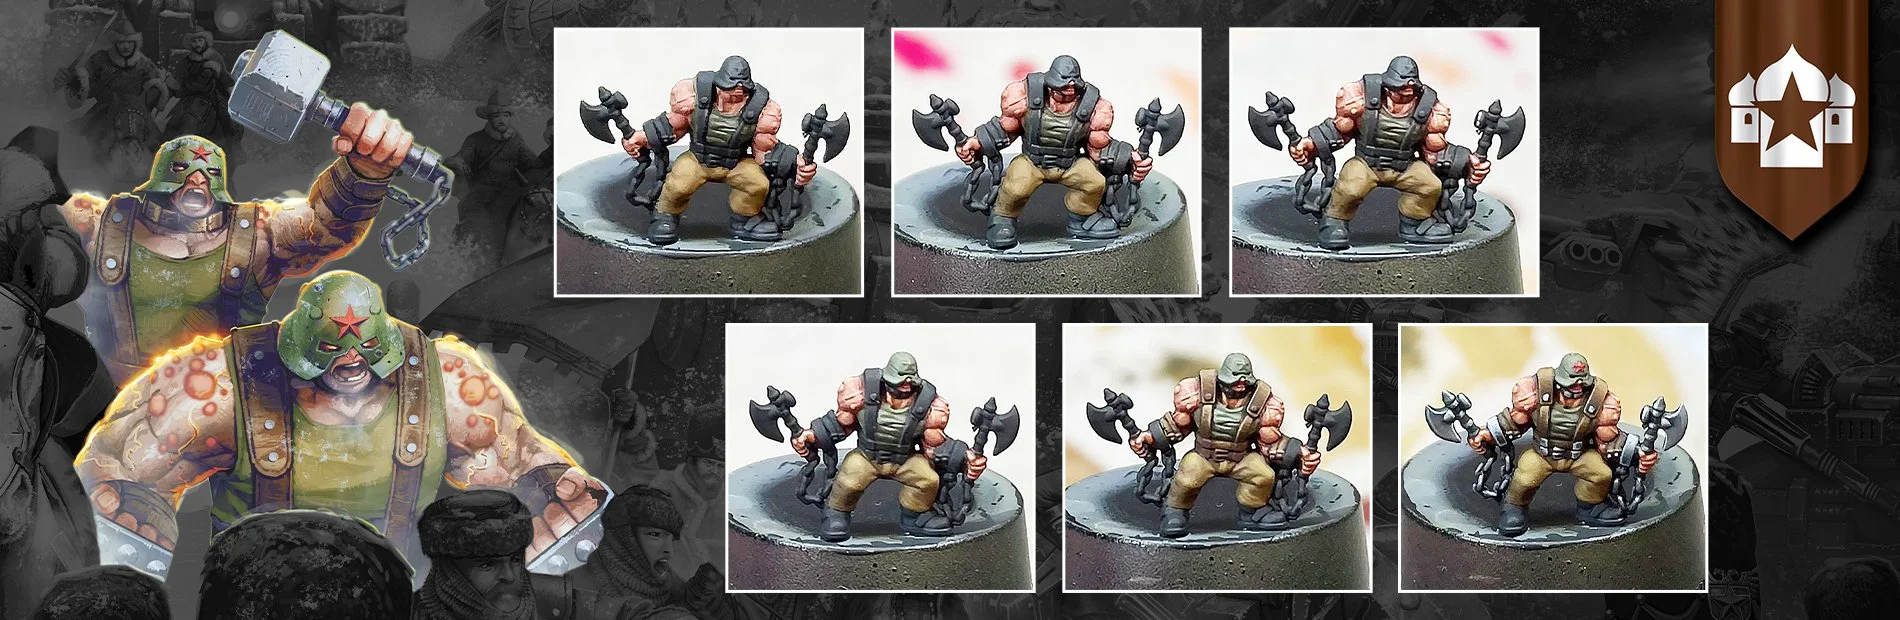
The latest entry of our Step-by-Step painting guide is here, and it’s the turn of the Yarost-tainted, rage-filled beasts - the Azhdaya Berserkers.
Daz has provided a step-by-step guide on how he perfected the paint scheme for these pustulous experiments, including ways to hint at the grim details even at 10mm.
Follow along with Daz as he explains how to tie your Azhdaya Berserkers into your Commonwealth army perfectly, in the name of the Tzar.
Paints and Equipment
Vallejo Paints
Tan
Yellow Olive
Bloody Red
Gory Red
Dead White
Black
Basalt Grey
Sombre Grey
Hull Red
Flat Earth
Camouflage Green
Dead Flesh
Sepia Ink
Dark Star Metallics
Baroque
Brushes
Rosemary and Co Series 33 Size 0
Basecoat/Skin
Step 1: Due to the multi-layered nature of the Berserker, I decided to basecoat the largest areas of the model before fully diving into each element. I painted the skin first using Tan, then the vest using Yellow Olive, and finally the trousers using a 75/25 mix of Flat Earth/Camouflage Green.
Step 2: I shaded the entire model using a 50/50 mixture of sepia ink and black, diluted to around 75% water. This wash was directed into the recesses rather than flooding, providing me with some fundamental blends to build upon later.
Step 3: The skin was picked out using Tan, diluted to around 50%, with a focus on pushing the volume of the muscles while leaving deep shading in the recesses. I repeated this step twice to give a solid mid tone.
Step 4: I created a mix of 75/25 Tan/Dead Flesh for the first highlight, once again building the volume of the muscles by placing the highlights towards the upper centre of the bulgiest areas.
Step 5: Focusing on the veins, boils, and where the muscles meet, I applied soft glazes of Gory Red. This will give the skin a swollen, angry look - ideal for these chemically enhanced psychopaths.
Step 6: I continued to highlight the skin, using a mix of equal parts Tan and Dead Flesh
Step 7: For the next highlight, I increased the Dead Flesh in the previous mix to 75%
Step 8: Next, I applied a soft glaze of Tan over the previously highlighted areas to bring them together and eliminate any chalkiness from the previous step.
Step 9: To finish with the skin, I picked out veins, boils and the highest points with Dead flesh - truly gruesome!
Clothing
Step 10: I began highlighting the trousers using the basecoat mix of 75/25 Flat Earth/Camouflage Green. I've left this quite basic for now, as I will come back to it later once all other parts are finished.
Step 11: The vest and helmet were highlighted with Yellow Olive, leaving the previous colour in the recesses.
Step 12: Adding a spot of Dead Flesh to the Yellow Olive, I applied the next highlight.
Step 13: The next highlight was created by adding just a spot more Dead Flesh to the previous mix
Step 14: Another spot of Dead Flesh was added to the previous mix to create the final highlight of this area, bringing the mix to approximately 50/50.
Step 15: I applied two very thin washes of Yellow Olive across the vest and helmet to tie the previous highlights together.
Leather
Step 16: All the leather areas were basecoated with Hull Red.
Step 17: I created a 75/25 mix of Hull Red/Flat Earth and applied it to the upper planes of the leather for the first highlight.
Step 18: I added 25% more Flat Earth for the next highlight.
Step 19: I mixed a spot of Dead Flesh into the previous mix for the final highlight. This was applied in quite a rough manner to simulate the texture of worn leather. Highlighting the edges is crucial at this stage to ensure that all our elements stand out from one another.
Step 20: Several thin glazes of Sepia Ink tie the highlights together.
Metal
Step 21: All metal areas were basecoated with an equal mix of Black, Sombre Grey and Baroque. I made sure to leave black lining between metal parts to ensure a good level of contrast.
Step 22: The first highlight for the metal parts was applied with Sombre Grey.
Step 23: I added 25% Dead White to the Sombre Grey for the following metal highlight.
Step 24: I increased the ratio to 75/25 Dead White/Sombre Grey for the final highlight.
Step 25:- I repeated the metal process on the axes, swapping out Sombre Grey for Basalt Grey to add a little variety to the metallics. To finish the model, I painted the emblem on the helmet with Bloody Red and glazed Flat Earth across the highlights on the trousers to blend them.
And there you have it, a wonderfully painted Azhdaya Berserker!
Make sure to keep an eye out for news on the latest releases on the Warcradle blog and follow us on Facebook, X and Instagram to stay up to date with any news or future Step-by-Steps.