
As the Sultanate introduce more advanced vessels to the seas of Dystopian Wars, Daz is back once again for another Step-by-Step.
Following his previous Step-by-Step on the Morea Class Cruiser from the Suleiman Battlefleet Set, Daz returns to provide a guide of how he paints his current Sultanate project: the Retaj Portalship.
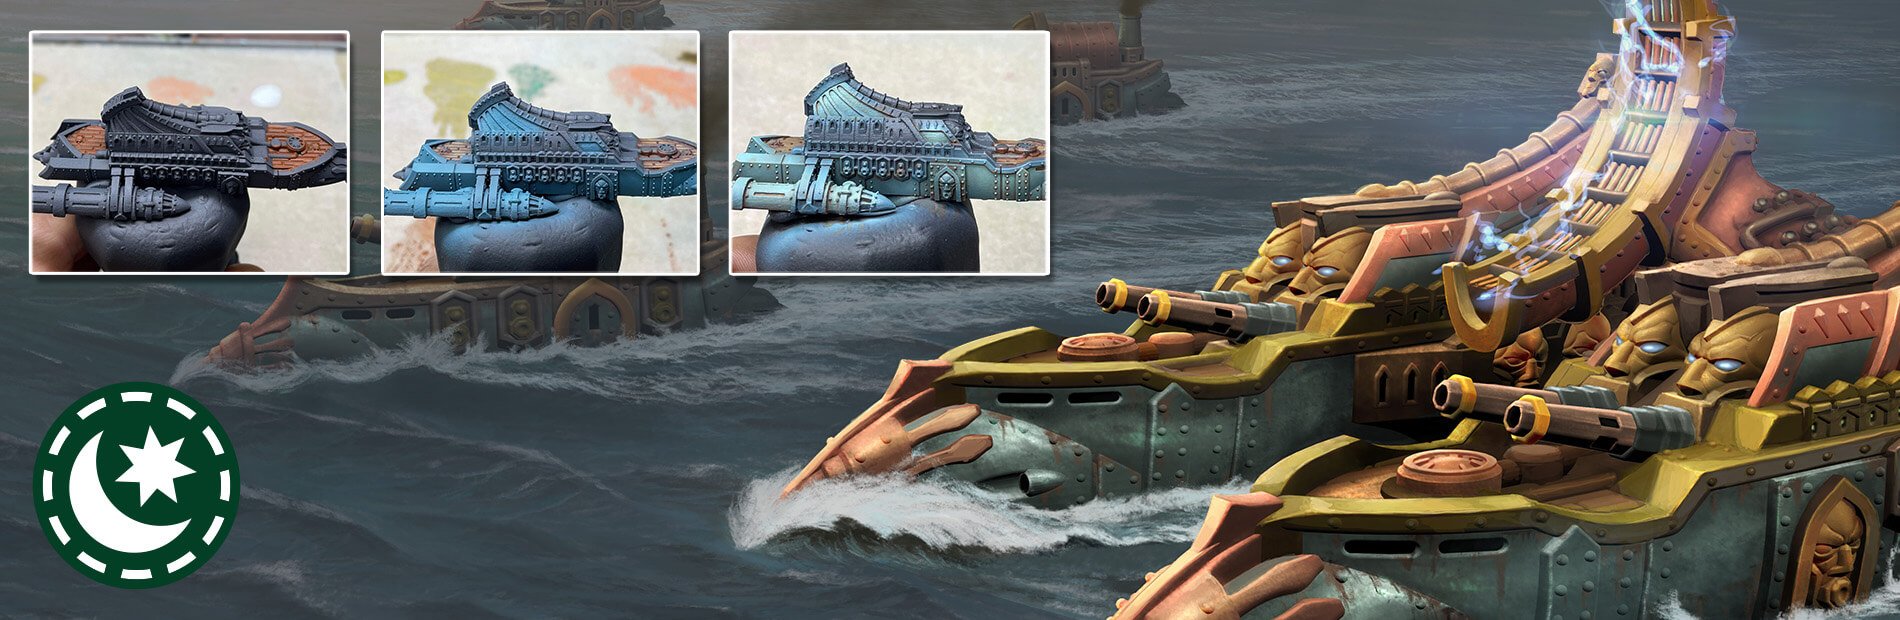
Grab your brushes and paints and get ready to follow along as Daz shows you how he paints the decking and hull of his Retaj Portalship. All paints are P3 unless stated otherwise.
Decking
Step 1 - To begin, any wooden decking areas were given two thin coats of Bloodstone to provide a strong starting point. Don't worry about being too neat as we'll be tidying up each stage with the next.
Step 2 - I applied the first highlight with Rucksack Tan. This highlight was placed in the widest areas of the planking and away from any edges touching other components of the ship.
Step 3 - Next, I added a spot of Mouldy Ochre to the Rucksack Tan (around 1 part Mouldy Ochre to 3 parts Rucksack Tan) and further highlighted any clear and open areas of decking.
Step 4 - Mixing up a watered down (50/50) wash of Brown Ink, I guided it into the areas I wanted to outline or darken.
Step 5 - From there I reapplied the Mouldy Ochre and Rucksack Tan highlight from Step 3. This time I was a little more careful with the application, focusing in on individual planks and ensuring that the darker areas were left untouched.
Step 6 - A final glaze of Caspian Flesh Wash (1 part Flesh Wash to 3 parts water) was applied to the entire area. This stage will help blend the highlights and add depth to the shading.
Blue Metalwork
Step 7 - To start with the hull I used an airbrush to apply two coats of Trollblood Base as a basecoat. I used silly putty to mask off the previously completed decking area so that it is covered from the airbrush. If you are using a paintbrush, I'd recommend the usual two thin coats approach to get a smooth solid finish.
Step 8 - Using a 3 parts Menoth White Highlight and 1 part Trollblood Base I airbrushed the upward facing and widest areas of the hull. If you do not have an airbrush I'd recommend several soft/focused drybrushes to achieve a similar result. Once this step was complete I applied a layer of Vallejo Gloss Varnish to the whole model ready for the next stage.
Step 9 - I applied my standard rusty wash of 3 parts Bloodstone 2, parts Vallejo Fluro Orange and 5 parts water to all of the blue metalwork. This will add depth and contrast tonally against the cold blue-green. This will also add a lot of visual interest to the background parts of the miniature.
And that finishes the decking and metalwork for now, but we'll be coming back to finish the process later on so don't panic!
Some great progress has been made on Daz’ Retaj already, make sure to stay tuned for part 2 where the rest of the metalwork is applied and the whole thing is tied together!


Make sure to keep an eye out for news on the latest releases on the Warcradle blog and follow us on Facebook, Twitter and Instagram to stay up to date with all we have to offer.