
That’s right, Daz has returned once again with another Step-by-Step for Armoured Clash, this time focusing on the Commonwealth.
With a powerful army comprising reserves from Poland-Lithuania, Siberia, Mongolia, and Russia, the Commonwealth takes pride in the might of its people. Daz is here to help you take pride in your army as he shows you how he paints the mainstay of his force, the Ryadovoy Rifle Platoon.
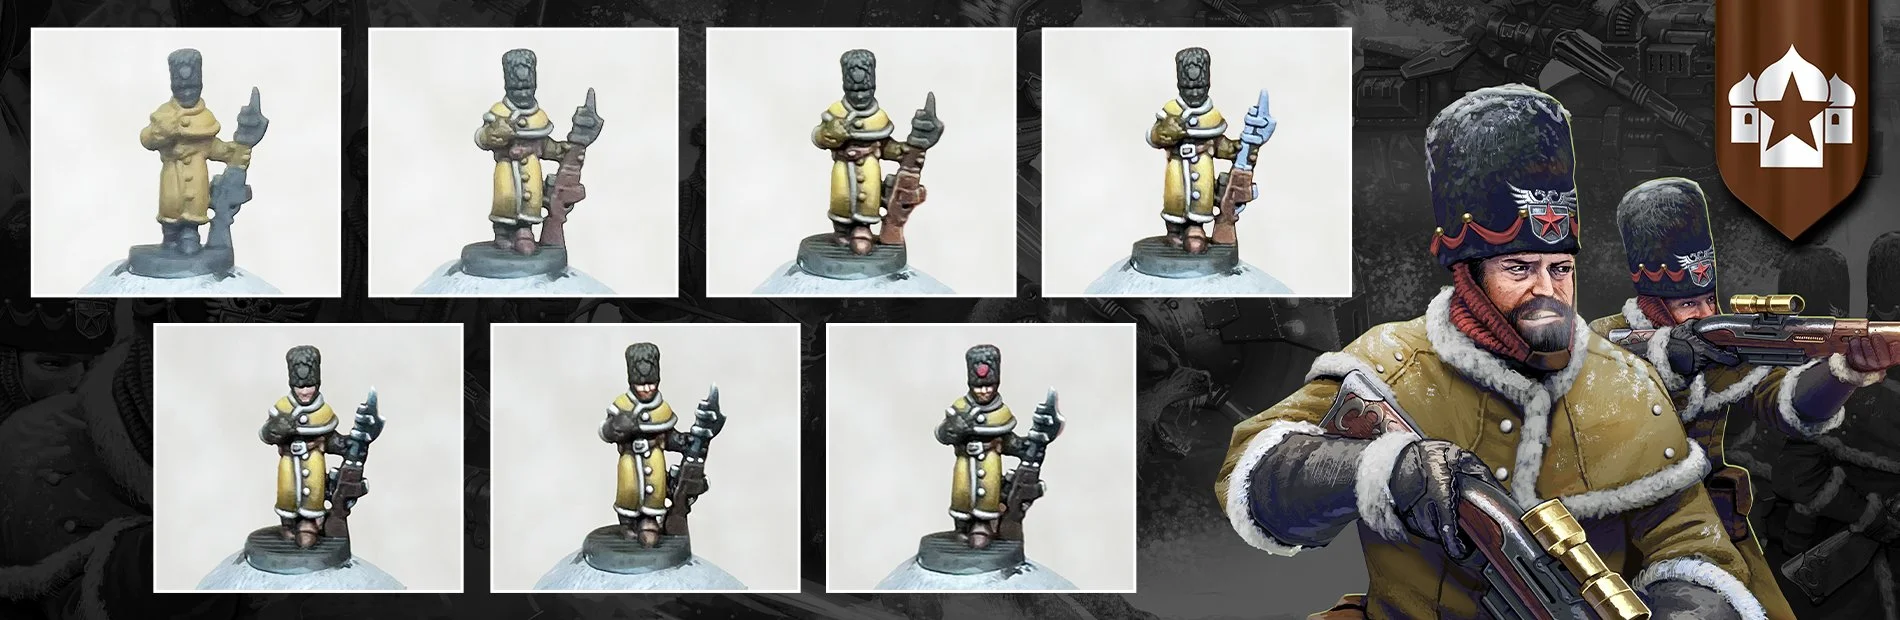
Follow along with Daz as he goes through how he achieves a great level of detail at such a small scale.
Paints and Equipment
Vallejo Paints
Bloody Red
Gory Red
Dead White
Black
Basalt Grey
Cold Grey
Sombre Grey
Hull Red
Flat Earth
Camouflage Green
Dead Flesh
Starship Steel Xpress
Dwarf Skin Xpress
Sepia Ink
Dark Star Metallics
Baroque
Brushes
Rosemary and Co Series 33 Size 0
Basecoat
Step 1: To start, I applied a basecoat of 75/25 Flat Earth/Camouflage Green watered down by around 50% over the uniformed areas. I repeated this process twice to ensure a solid foundation.
Step 2: Next, I applied a shade of 50/50 Sepia Ink/Black, watered down by around 75% water across the entire model to bring out the details and begin the shading process.
Step 3: To base the fur trim, I used Basalt Grey.
Step 4: Next, all leather and wooden areas were given a Basecoat of Hull Red.
Step 5: I created a 50/50 mix of Sepia Ink/Black, then watered it down by around 75%. I painted this mixture across the entire model to finalise the shading and clearly separate the differing elements.
Main Highlights
Step 6: I began the main highlights by reapplying the basecoat of 75/25 Flat Earth/Camouflage Green, watered down by around 50% back over the uniform areas, leaving shadows in the recesses and lower parts of the greatcoat.
To ensure a smooth blend, the highlight was drawn upwards using the side of the brush. This will leave a concentration of pigment at the highest point, giving a smooth transition.
Step 7: The next highlight on the uniform was applied with Camouflage Green, watered down by 75%. I applied this in the same manner as the previous highlight, beginning the brush stroke a little higher than the last.
Step 8: The final highlight on the uniform was applied with 50/50 Camouflage Green/Dead Flesh watered down by 85%. This was applied to the very upper edges of the uniform, and where two different elements meet to ensure definition.
Step 9: All wooden and leather areas were highlighted with 75/25 Hull Red/Dead Flesh. This was applied broadly, as we don’t want to overwhelm the finished uniform.
Step 10: A final highlight of a 50/50 mix of Hull Red/Dead Flesh was applied to the upper edge of the leather and wooden areas. This was kept minimal to avoid creating a shine or an appearance of hard texture.
Fur
Step 11: I began the highlighting process of the fur using Basalt Grey.
Step 12: The fur trim was then further highlighted with a 50/50 mix of Basalt Grey/Cold Grey
Step 13:To finish the highlights on the fur trim, I used Cold Grey.
Steel
Step 14: All steel areas were given a basecoat of 75/25 Sombre Grey/Baroque. I prefer to mix a non-metallic paint with my metallics to tone down the "glittery" effect - something that looks very out of place on a really small mini.
Step 15: I added 50% Dead White to the previous Sombra Grey/Baroque mix for the first highlight on the steel. I exaggerated this to simulate the shine on clean metal.
Step 16: Starship Steel Xpress Paint was applied to the steel areas to blend out the previous highlight and add depth to the shadows. I also used this to blacken down the gloves a little further.
Face
Step 17: The face was based with a 50/50 mix of Hull Red/Dead Flesh.
Step 18: Next, I shaded down the face of the miniature with a wash of Dwarf Flesh Xpress Paint watered down 50/50
Step 19: To finish the face, I applied a highlight of a 25/75 mix of Hull Red/Dead Flesh.
Final Touches
Step 20: To complete the overall look of the hat, I applied a very light drybrush of Basalt Grey.
Step 21: Finally, as an additional touch, I selected the army badge on the hat with Gory Red, then applied a small highlight with Bloody Red to finish.
Make sure to keep an eye out for news on the latest releases on the Warcradle blog and follow us on Facebook, X and Instagram to stay up to date with any news or future Step-by-Steps.