
It’s step-by-step time once more and we are looking at the giant Metzger Colossus from the Hochmeister Battlefleet Set.
Having spent a countless amount of time under the water, Daz’ Vitruvian Colossus has propelled itself to the surface to show off its paint job, looking equal parts rusted and ruthless.
Follow along with Daz as he shows off how he achieved the weathered look of his Colossus which leaves it leagues above, or should that be below, any ship looking to take it on.
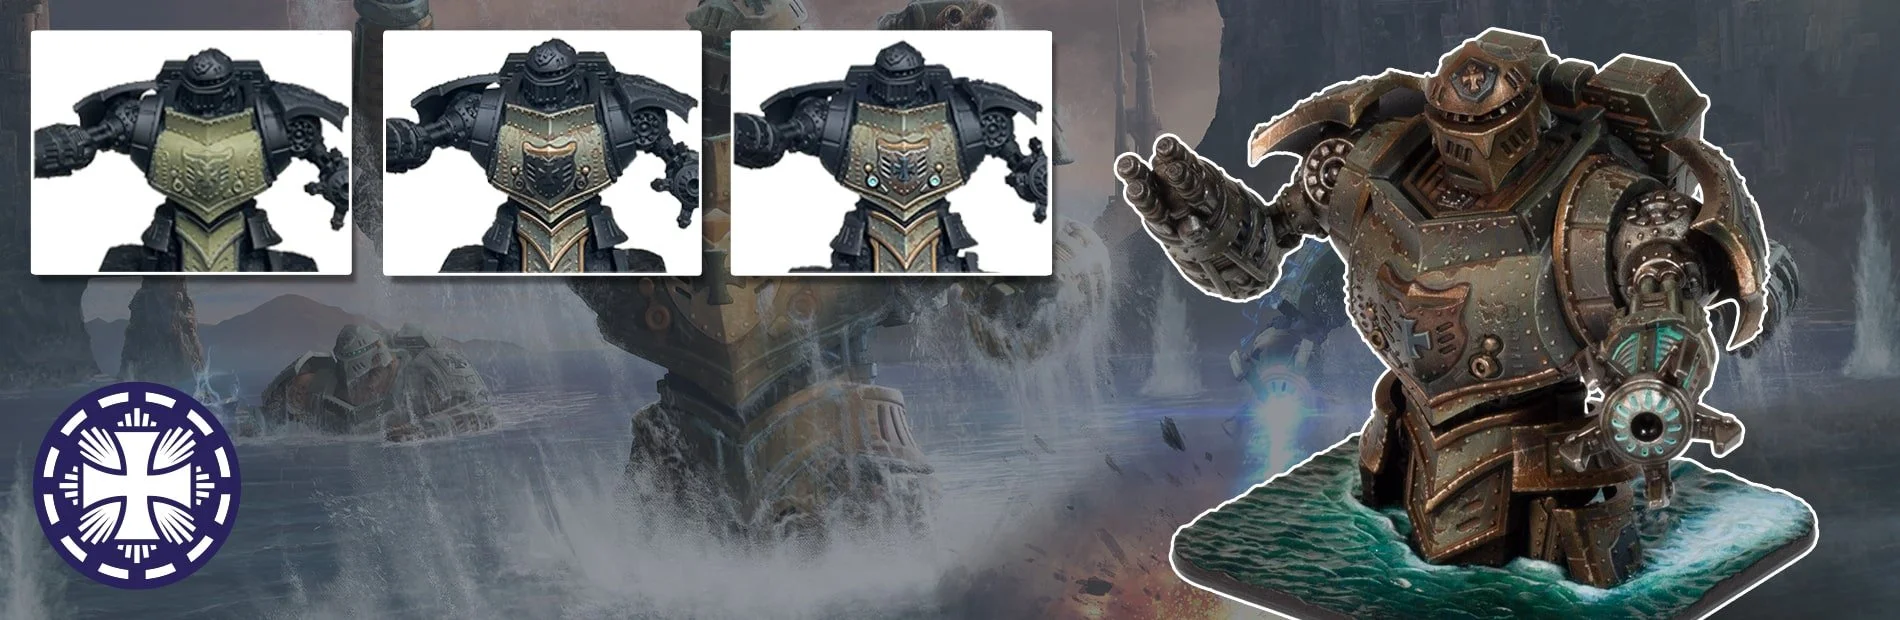
Armour Panel
Step 1: To start out I applied three layers of Traitor Green to give a strong base to work with. This was watered down 50/50 and applied by brush. It's very important to do this as we’re going to be applying a lot of weathering later and can easily lose the original colour.
Step 2: To follow, I applied some strong shading using 3/1 water to Cryx Bane Base, treating the light source as above and to the right slightly to accentuate the massive plates of armour.
I pulled the shade towards the darkest points ensuring a sharp finishing edge as the use of strong shadows will further enhance the scale of this immense war machine.
Step 3: To add a little vibrancy to the shadowed areas I’ve applied some soft glazes of Coal Black across the blend points and deepest recesses.
Step 4: To begin the highlighting process I’ve added a little Menoth White Base to Traitor Green to sketch in the first broad highlight.
I’ve focused this on the diagonal opposite areas to the shadows and ended my edges sharp up to the shadowed areas to force a contrast between the armour plates.
Step 5: For the second highlight I added more Menoth White Base to bring the previous mix to around 50/50. Don’t worry about being super smooth with your blends, we’ll fix that later. Do make sure that your edges are nice and sharp, especially where they meet the shadows.
Step 6: The final highlight was applied with pure Menoth White Base. I used this to edge all the armour plates and pick out rivets.
Weathering
Step 7: To begin the weathering stage I’ve sponged on some neat Umbral Umber. You want your paint sticky for this step as wet paint will just leave smudges instead of nice sharp chips and dings.
Step 8: The next step is to underline all of the major chips and dings with Menoth White Base to match up with our previous highlight. I use a size 0 brush to get nice tight lines, but you can always tidy up with a little Umbral Umber.
Step 9: Time to get messy! I’ve stippled on a few glazes of Bloodstone to give an illusion of rust and dirt. It’s important to let each stage dry before repeating or you can end up taking off some previous layers.
Step 10: This time I’ve applied a more controlled glaze of Bloodstone to create pools and streaks of rust.
Step 11: To finish I’ve deepened the tone of some of the rusty areas by adding streaks of Umbral Umber. I then tidied up and re-undercoated ready for the next part.
Bronze
Step 12: To start on the bronze elements, I made a mix of 50/50 Umbral Umber and Molten Bronze for the base coat. This mix has far better coverage than using the metallic paint on its own.
Step 13: Next, I added 50% Meaty Ochre to the previous mix to apply the first highlight. I made sure to follow the same light directions used on the green armour.
Step 14: Then, an edge highlight was applied with Cold Steel.
Step 15: Finally, I shaded the bronze parts with Umbral Umber, pulling the paint towards the shadows.
Steel
Stage 16: To start, all steel areas were base coated with Pig Iron.
Step 17: I shaded the steel areas with several glazes of 50/50 Thamar Black and Turquoise Ink. Each glaze started a little further down to deepen the shadows smoothly while still keeping a hint of colour from the turquoise.
Step 18: I added some glazes of Bloodstone to tie the steel weathering in with the rest of the mini.
Step 19: To finish the steel I highlighted the edges and details with Cold Steel.
Black Cross
Step 20: The cross was base coated with a 50/50 mix of Thamar Black and Coal Black.
Step 21: I added a little Menoth White Highlight to the previous mix for the first highlight that was applied.
Step 22: Finally, I added more Menoth White Highlight to around 50/50 for the edge highlights.
Lights
Step 23: To paint the interior of the lights I used Arcane Blue
Step 24: I highlighted the centre of the light and the bottom edge of the socket with a mix of 75/25 Menoth White Highlight/Arcane Blue.
Step 25: The final highlight was applied using pure Morrow White.
Step 26: To finish the lights I applied a glaze of 75/25 Arcane Blue/Vallejo Fluro Green.
And just like that, we’re done with the front plates of the Colossus!
How amazing does Daz’ Colossus look already? Why not pick up your own in the Hochmeister Battlefleet Set at your FLGS or online at Wayland Games.


Containing three Vitruvian Colossi that can be built as either a Hochmeister or Metzger, these incredibly detailed deep sea dwellers will help propel your forces to victory.