

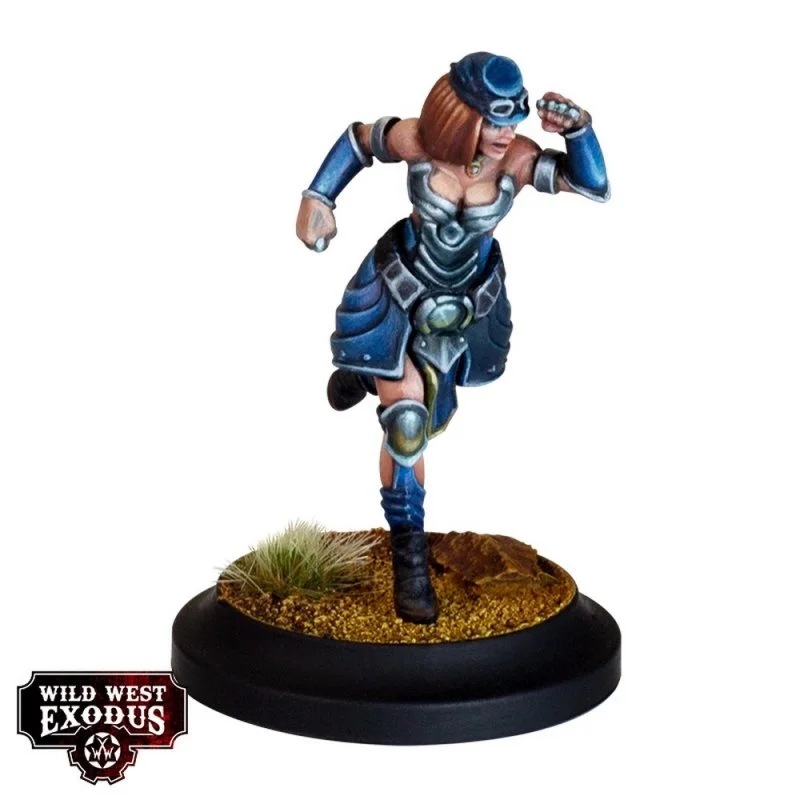
Work continues on Daz’ Union Belle from the Wild West Exodus Showdown at Retribution Two Player Starter Set.
Union Belle has been busy preparing herself for battle and today we will show you the importance of armour, not just for protection, but how good it can also look!
Follow along with Daz, and achieve Union Belle’s armour using the steps below.
Step 1: I started off adding a base coat to the armour with P3 Cygnar Base Blue. I applied this in two thin coats, watered down around 50/50, only applying the second coat to the areas that would catch the light, leaving the first to provide a rudimentary shade.
Step 2: Next, I applied a shade of watered down 50/50 Exile Blue/Thamar Black to the recesses.
Step 3: The first highlight I applied using a mix of 50/50 Cygnar Base Blue and Cygnar Blue Highlight.
Step 4: Then, Pure Cygnar Blue Highlight was applied to the flat upwards facing planes and edges. This was watered down around 50/50 and applied in three layers to give a nice blend.
Step 5: I added P3 Underbelly Blue to the previous mix and roughed in some sharper highlights to the flat panels and edges.
Step 6: For the next highlight I used pure Underbelly Blue watered down around 50/50.
Step 7: I applied the final edge highlight and added some scratches and points of light with pure P3 Frostbite.
Step 8: To unify the previous stages I applied a glaze of P3 Turquoise Ink.
Step 9: To add a little visual interest I applied a liberal wash of Bloodstone into the recesses of the armour!
Step 10: Moving onto the steel sections, I gave 95% of the steel areas a base coat of P3 Asheth Grey. I did my best to ensure a line of black was left between each armour segment to save time later.
Step 11: I added Greatcoat Grey to make a 50/50 mix and then sketched in the major highlights. Don't worry if you don't get it absolutely right at this stage as we can easily correct things as we go along.
Step 12: I applied the next highlight with just the Greatcoat Grey. I'm looking for a high sheen finish so I'm only going to reduce the highlight area by a tiny amount.
Step 13: This time I'm committing more to my highlight shapes with a layer of Underbelly Blue. This is watered down around 30/70 to create a heavyish glaze which is then pushed to the centre of the highlight areas. Once again I'm only reducing the highlight area by a tiny amount to retain contrast.
Step 14: I added Menoth White Highlight to the previous mix and continued to build the highlights on the flat areas and outline the armour panels.
Step 15: Similar to earlier, I applied a thin glaze of Turquoise Ink to the steel areas to unify the previous steps.
Step 16: I continued to highlight the upper areas and edges with pure Frostbite. I also added some points of light and scratches.
Step 17: Picking out the sharp edges, I added a few more points of light with Menoth White Highlight.
Stage 18: The final highlights I added were with pure Morrow White.
Step 19: I applied several thin glazes of P3 Sanguine Base to give a little punch and interest to the darkest areas.
Step 20: And the very final highlight of Morrow White was applied to reinforce any areas I wanted to be super shiny.
We're done!
Looking to pick yourself up a Union Belle from the Showdown at Retribution Two Player Starter Set? Get yours at your FLGS or online at Wayland Games.

Containing dozens of fantastically detailed Warcradle miniatures, the full third edition rulebook, quick start guide to help you get going straight away and much more.